Update Android 2.2 (FroYo) firmware[]
Update-Anleitung (von PEARL)[]
- Copy the two files update_app.zip and update_system.zip onto an SD memory card or USB stick
Connect the TV Box to your TV set via HDMI or AV cable
- Pull the mains plug from the Android box
- Now insert the SD memory card or USB stick into the Android box
- Now press and hold the power button on the front of the Android Box. At the same time, plug in the power supply again.
- Hold the power button down for approx. 5 seconds until the blue status LED appears (Power LED), then let go.
- Now the update process begins. A yellow bar shows the update process.
- The box will be restarted during the update process. Please wait until the update is complete.
- After the update has been carried out, you can remove the SD memory card or USB stick.
Changelog[]
- r873: (Auslieferungs-Firmware vom 15.12.2011)
Download[]
- Pearl FTP server, version r873: ftp://ftp.pearl.de/treiber/PX1549_12_110578.zip
- Multiupload, version r873[2]: [1]
MD5-Prüfsummen[]
- r873: 5fead262e873d82807fff46872cc2663
Update from android 2.2 (FroYo) to 4.0.3 (IceCreamSandwich)[]
To succesfully update the firmware from 2.2 to 4.0.3 the systems NAND partition table needs to be altered. At this moment the only way to do that is by asking the manufacturer to upgrade for you, or to do it yourself via the U-boot bootloader (fastboot).
UART
To communicate with the bootloader you'll need an USB to UART or RS232 to UART converter. Other MMB-422 users used an USB to UART converter but some of them had some problems so I decided to go the old fashioned way. I've an old WinXP laptop with an RS232 serial port. I made my RS232-UART converter myself. I used an MAX232 and an couple of other components. See schematic
<img data-rte-meta="%7B%22type%22%3A%22image%22%2C%22wikitext%22%3A%22%5B%5BFile%3ACircuit_232.jpg%7Clink%3Dhttp%3A%5C%2F%5C%2Fsodoityourself.com%5C%2Fmax232-serial-level-converter%5C%2F%7Cframe%7Cleft%7CRS232%20to%20UART%20converter%5D%5D%22%2C%22title%22%3A%22Circuit_232.jpg%22%2C%22params%22%3A%7B%22framed%22%3Afalse%2C%22alt%22%3A%22Circuit%20232%22%2C%22align%22%3A%22left%22%2C%22caption%22%3A%22RS232%20to%20UART%20converter%22%2C%22captionParsed%22%3A%22RS232%20to%20UART%20converter%22%2C%22link%22%3A%22http%3A%5C%2F%5C%2Fsodoityourself.com%5C%2Fmax232-serial-level-converter%5C%2F%22%7D%7D" data-rte-instance="269072-1407948915267e4712bc60" alt="" src="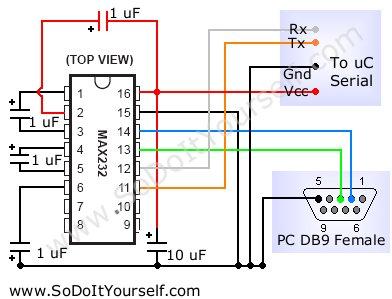 " width="392" height="299" class="image frame alignLeft withCaption" data-image-name="Circuit 232.jpg" data-image-key="Circuit_232.jpg" type="image" />
Connect the converter with the MMB-422 board as follows where VCC=V+ (5 Volts).
<img data-rte-meta="%7B%22type%22%3A%22image%22%2C%22wikitext%22%3A%22%5B%5BFile%3AMainboard_top_UART.jpg%7Cthumb%7Cleft%7CPhoto%20by%20M1cha%2C%20edited%20by%20BoBBes%5D%5D%22%2C%22title%22%3A%22Mainboard_top_UART.jpg%22%2C%22params%22%3A%7B%22thumbnail%22%3Atrue%2C%22alt%22%3A%22Mainboard%20top%20UART%22%2C%22align%22%3A%22left%22%2C%22caption%22%3A%22Photo%20by%20M1cha%2C%20edited%20by%20BoBBes%22%2C%22captionParsed%22%3A%22Photo%20by%20M1cha%2C%20edited%20by%20BoBBes%22%7D%7D" data-rte-instance="269072-1407948915267e4712bc60" alt="" src="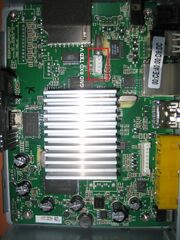 " width="180" height="240" class="image thumb alignLeft withCaption" data-image-name="Mainboard top UART.jpg" data-image-key="Mainboard_top_UART.jpg" type="image" />
I tested the connection with a simple terminal program called <a data-rte-meta="%7B%22type%22%3A%22external%22%2C%22text%22%3A%22Termite%22%2C%22link%22%3A%22http%3A%5C%2F%5C%2Fwww.compuphase.com%5C%2Fsoftware%5C%2Ftermite30.zip%22%2C%22linktype%22%3A%22text%22%2C%22wasblank%22%3Afalse%2C%22wikitext%22%3A%22%5Bhttp%3A%5C%2F%5C%2Fwww.compuphase.com%5C%2Fsoftware%5C%2Ftermite30.zip%20Termite%5D%22%7D" data-rte-instance="269072-1407948915267e4712bc60" rel="nofollow" class="external text" href="http://www.compuphase.com/software/termite30.zip">Termite</a> but you can also use putty.
Termite config: 115200/8/1/N. Now when you plugin your MMB-422 you can see the bootproces. Congratulations! You made a working serial connection with your set-top box!
Upgrade proces[]
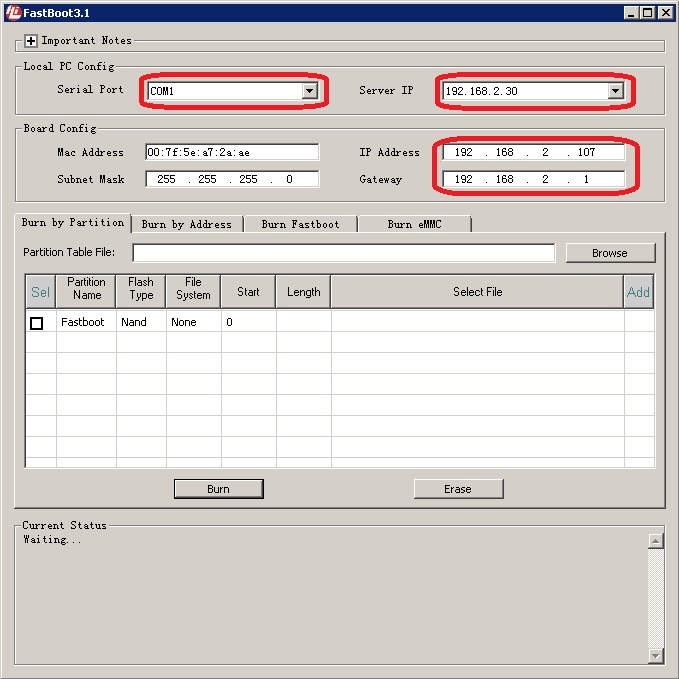
Now, download the update package and extract it somewhere. With the package comes the program fastboot v3.1.8 Because some users reported problems with this version, I used v3.1 (I will upload it later). To prevent connection problems I recommend to use normal LAN to connect the PC and MMB-422 to your network. I used a normal CAT5 LAN cable to make a connection to the router. Power on the MMB-422 and run the Fastboot program.
Server IP: IP address of your PC (automatic asigned)
IP adress: Choose a free IP adress in your network, it will be asigned to the MMB-422 by the fastboot program.
Gateway: IP address of your router
MAC-address: MAC address of your MMB-422 (see sticker on LAN-port)
Subnet mask: Your networks subnet mask
Select the tab "Burn by patition" and click browse. Select partition_table_hi3716cdmoverb_ics_spi_mele.xml from the update package and click on "Burn"
The proces of flashing can take up to 15 minutes. Please be patient, do not disconnect until you see "Partition burning completed!!!"
Now you've succesfully burned the ICS firmware!
Flash error[]
Do you get an error while flashing?
- Check your settings and try again.
- Do you use a USB-UART converter? Try a different driver or use a RS232-UART converter
- Is your router working?
Downloads[]
- Upload.to, version 4.0.3 ICS: http://uploaded.net/file/ys6rtsy1
Troubleshooting[]
I had a problem flashing some firmware. The MMB-422 ended up with booting into the recovery. There was no way that I could use to set the Bootflag to the normal partition. The only solution wich was working for me was to select all the partitions, except the fastboot partition, in the fastboot programm and then erase them. After that I succefully flashed the 4.0.3 ICS firmware again and it went up and running!
source: Android-hilfe.de